Practical Life: Water Pouring (II)
The first version of this wet pouring lesson (found on our blog, Water Pouring (I)) is slightly simpler in that the child will pour water from one jug into another, and clean up any spills along the way. It’s an exercise in coordination, concentration and fine motor skills.

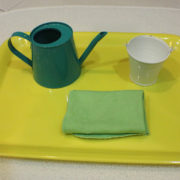
A progression of this initial task is Water Pouring (II) whereby water is poured from a jug into two containers (bowls or cups) and then back into the jug. To present this lesson, you will need: a tray, a jug that is comfortable for a child to use and has a wide mouth (so that the water can plausibly be poured back into it), two bowls or cups and a sponge for cleaning.
Next, you will demonstrate the lesson to your child. First, pour water from the jug into one bowl and then into the other – mete out the water between containers until there is none left in the jug. Then wipe the rim of the jug with sponge (and clean up any additional spills). After cleaning, pour water from each bowl back into the jug, wiping around the rim of each container and cleaning up any residual water.
It is simple but the level of control required by a small child (with a typical impulse to pour haphazardly) is no mean feat. Have a look at the below tutorial by My Montessori Works to see the pace of the lesson – the intention and precision required in the enactment of the activity:
There is a wonderful sense of independence once a child has mastered the skill of pouring – with control and accuracy; he will be able to pour his own water during meal times, and even offer a drink to others. It really is an achievement!
If you’d like further information about this tutorial, feel free to contact us at info@saintandrewsmontessori. We’re happy to answer any questions.
Photo by Johnny McClung on Unsplash


